Cover 6
What Is Cover 6?
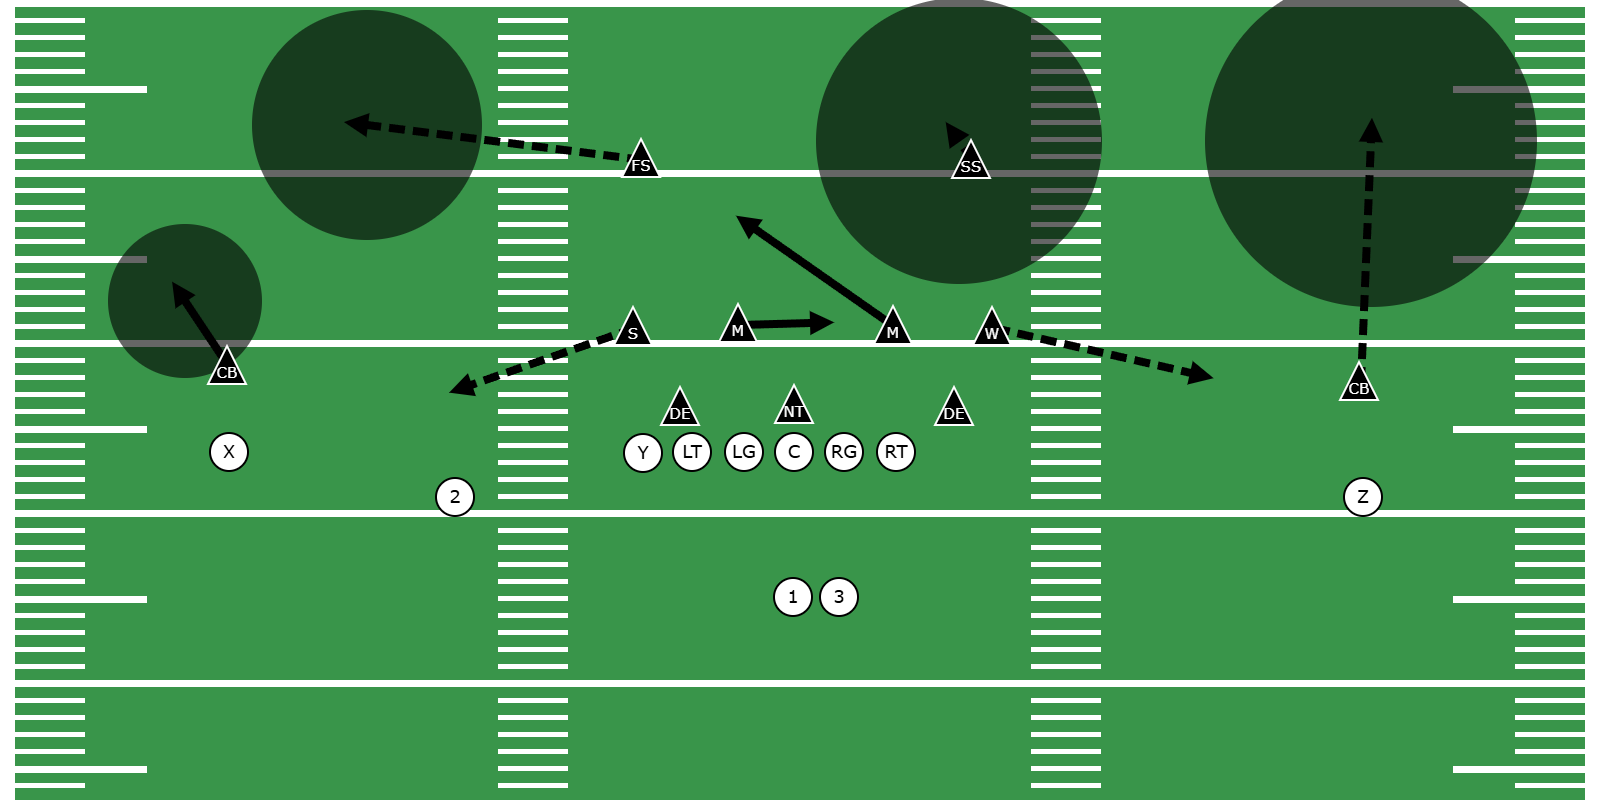
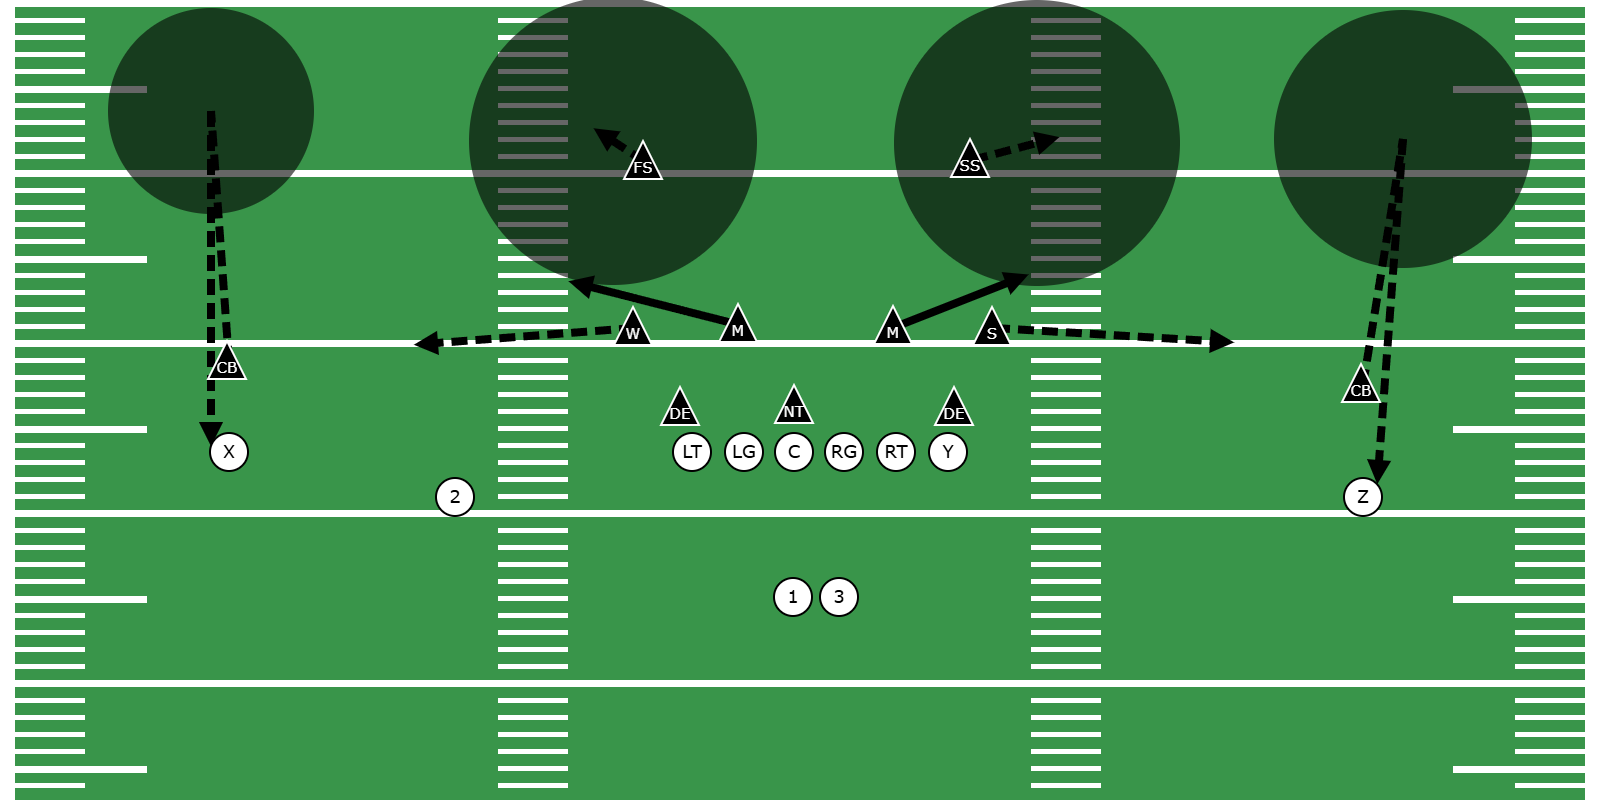
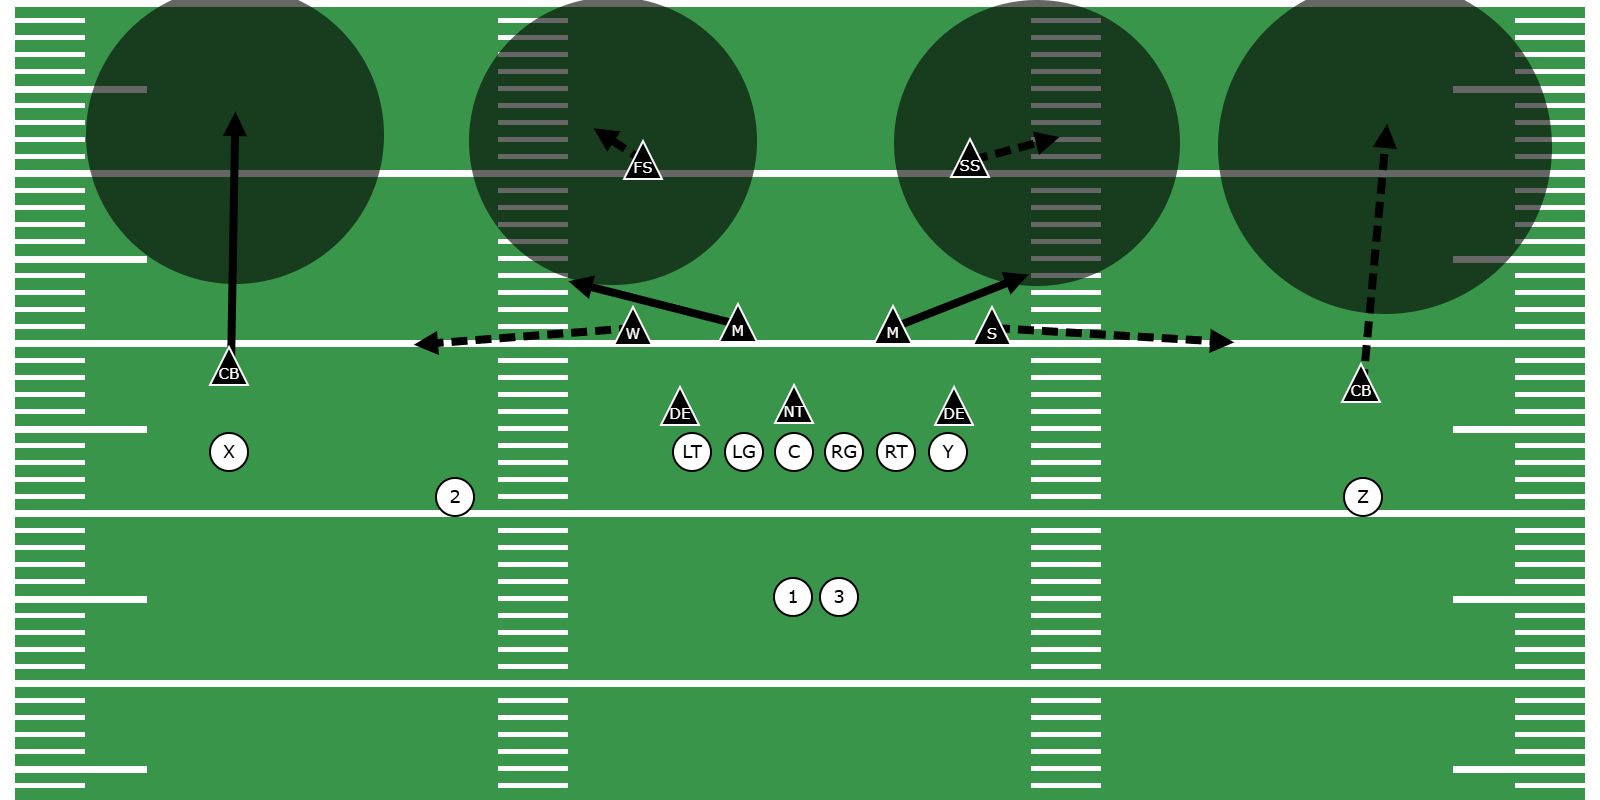
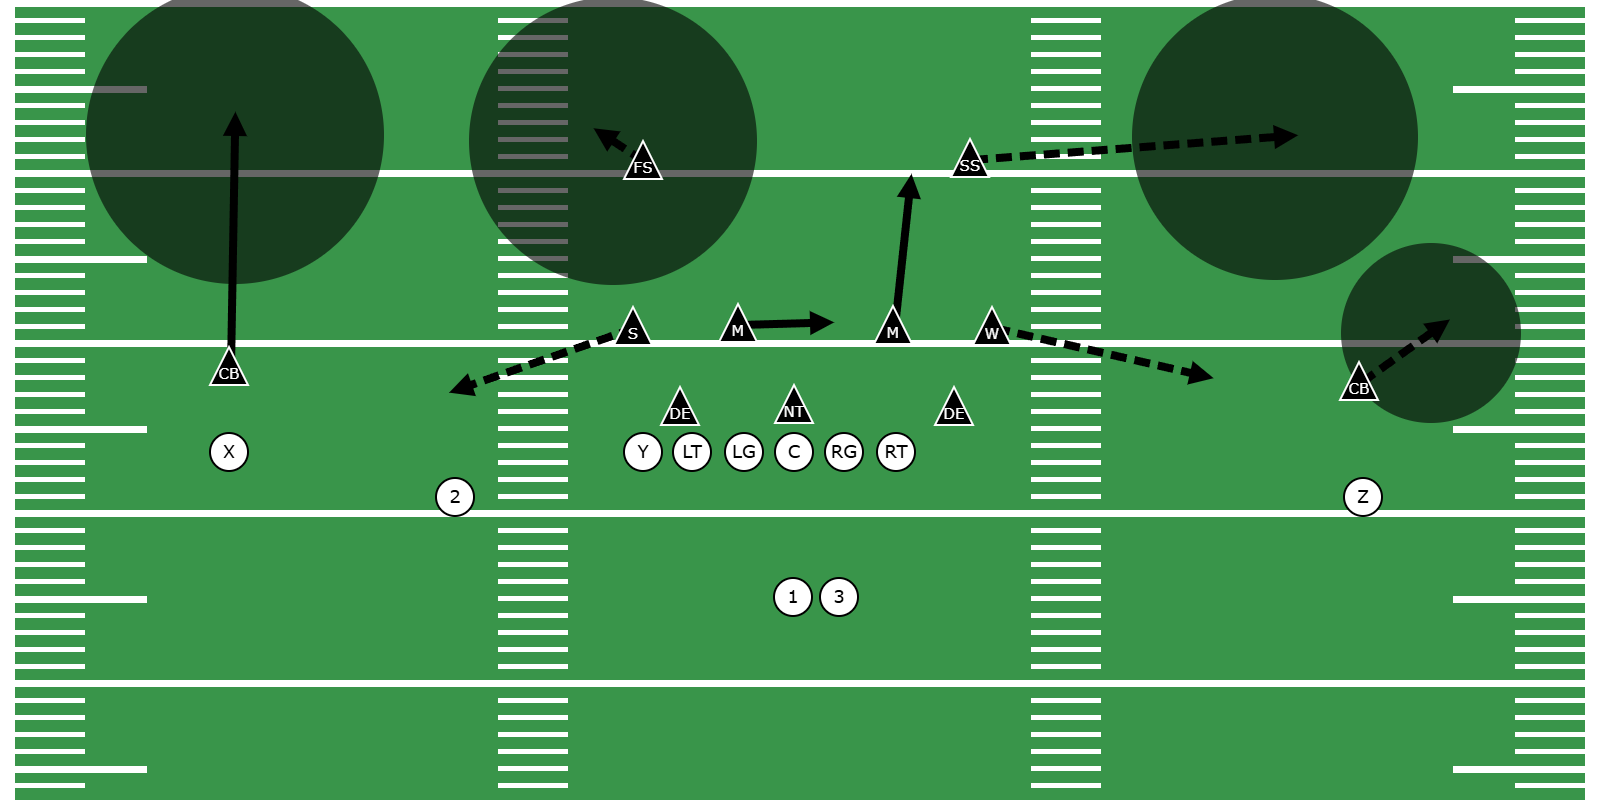
A common Cover 6 structure divides the secondary into two different coverage families.
On the Quarters side:
- Cornerback protects the outside quarter.
- Safety protects the inside quarter.
- Defenders use Quarters rules against #1 and #2.
On the Cover 2 side:
- Cornerback plays an underneath outside responsibility.
- Safety protects the deep half.
- Underneath defenders help complete the short-zone structure.
The result is an asymmetrical coverage.
The defense is intentionally playing different techniques on opposite sides of the formation.
That is the defining feature of Cover 6.
Why Is It Called Cover 6?
The name is commonly explained as:
Cover 4 + Cover 2 = Cover 6.
That is a useful memory device, but it should not be interpreted as six defenders simply dividing the deep field.
Cover 6 does not normally mean six deep defenders.
Instead, it describes a coverage that combines principles associated with Cover 4 and Cover 2.
Another common name is:
Quarter-Quarter-Half.
That description more accurately reflects the deep-field distribution.
Two defenders protect quarters on one side while a safety protects a half on the other.
Split-Field Coverage
Cover 6 belongs to a broader family of split-field coverages.
A split-field defense can make a coverage decision independently to each side of the formation.
That allows the defense to respond to:
- Receiver count.
- Formation strength.
- Field and boundary.
- Tight end location.
- Offensive tendencies.
- Individual receiver matchups.
- Run strength.
This flexibility can be extremely useful against spread offenses.
The tradeoff is communication.
Every defender must know which coverage is being played to his side and how that coverage connects to the rest of the defense.
Receiver Numbering
Receiver numbering helps organize Cover 6.
On each side of the formation:
- #1 is the widest eligible receiver.
- #2 is the next eligible receiver inside.
- #3 is the next receiver inside when present.
The Quarters side commonly uses #1 and #2 as primary route keys.
The Cover 2 side also needs to identify those receivers because the corner, safety, and underneath defenders must distribute vertical and underneath threats correctly.
Using receiver numbers instead of position names allows the coverage to adjust when the offense changes personnel.
Basic Cover 6 Structure
A common four-man-rush Cover 6 structure can include:
Quarters Side
- Cornerback: outside quarter / #1 vertical responsibility.
- Safety: inside quarter / #2 vertical responsibility.
- Underneath defender: hook, curl, or flat relationship based on the system.
Cover 2 Side
- Cornerback: underneath outside or flat responsibility.
- Safety: deep half.
- Underneath defenders: interior zones and route distribution.
Pass Rush
- Four defenders rushing the quarterback.
The exact underneath distribution varies considerably by defensive system.
The important structural feature is the difference between the two sides.
The Quarters-Side Corner
The Quarters-side corner commonly treats #1 much like he would in Cover 4 Quarters.
If #1 releases vertically, the corner generally carries or matches him.
The corner should:
- Maintain proper leverage.
- Stay on top of vertical routes.
- Recognize when #1 is no longer a deep threat.
- Communicate route exchanges.
- Understand the safety’s relationship to #2.
- Support the run according to the Quarters-side fit.
The corner should not expect automatic safety help on #1.
If #2 releases vertically, the safety may be occupied with him.
The Quarters-Side Safety
The Quarters-side safety commonly reads #2.
If #2 releases vertically, the safety generally carries or matches him.
If #2 releases short, inside, outside, or blocks, the safety’s responsibility may change according to the coverage rules.
That can allow the safety to:
- Help against another route.
- Drive an inside-breaking route.
- Support the run.
- Fit the alley.
- React to a crossing route.
This is one reason Cover 6 can maintain strong run support even from a two-high shell.
The Quarters safety is not necessarily removed from the run fit simply because he begins deep.
The Cover 2-Side Corner
The corner on the Cover 2 side normally plays underneath rather than protecting a deep quarter.
His responsibilities can include:
- Defending the flat.
- Rerouting #1.
- Disrupting vertical releases.
- Sinking underneath intermediate outside routes.
- Driving on short throws.
- Supporting the perimeter run.
The corner must understand that the safety is protecting deep over him.
That allows the corner to play more aggressively underneath than the Quarters-side corner.
The two cornerbacks may therefore use completely different techniques on the same play.
The Cover 2-Side Safety
The Cover 2-side safety protects the deep half.
He must:
- Stay deeper than the deepest threat.
- Gain enough width to protect the sideline.
- Read the route distribution.
- Recognize vertical routes by #1 and #2.
- Protect against corner routes.
- Maintain discipline against play-action.
- Take good angles to deep throws.
The safety cannot assume the underneath corner will carry a vertical receiver.
The corner may reroute the receiver, but the safety is ultimately responsible for protecting the deep portion of the field.
Underneath Defenders
The underneath defenders connect the two halves of Cover 6.
Their responsibilities may include:
- Hook zones.
- Curl areas.
- Flat support.
- Rerouting inside receivers.
- Matching running backs.
- Carrying crossing routes.
- Supporting the run.
The defense must pay particular attention to the middle of the field.
Because the two sides use different coverage principles, route combinations that cross from one side to the other can challenge the communication between them.
The coverage cannot be taught as two completely independent groups.
Why Defenses Use Cover 6
Cover 6 allows the defense to solve different problems on opposite sides of the formation.
Formation Flexibility
The defense can use Quarters against one receiver distribution and Cover 2 against another.
Field/Boundary Flexibility
The coverage can be set based on the wide side and short side of the field.
Receiver Matchups
The defense can provide Cover 2 help over a dangerous receiver while maintaining Quarters elsewhere.
Run Support
The Quarters safety can remain involved in the run fit based on his receiver key.
Two-High Presentation
The defense can maintain a split-safety shell before the snap.
Route-Specific Answers
Different route concepts can be attacked with different coverage principles on each side.
Strengths of Cover 6
Cover 6 can provide:
- Strong vertical protection.
- A flexible two-high structure.
- Different coverage answers to opposite sides of the formation.
- Safety help over a selected outside receiver.
- Quarters run-support principles on one side.
- Aggressive flat coverage on the Cover 2 side.
- Useful disguise with Quarters, Cover 2, and other split-safety coverages.
- Adaptability to offensive formations and field position.
Its greatest strength is not any single zone.
Its greatest strength is the ability to distribute defenders differently based on the offensive threat.
Weaknesses of Cover 6
The flexibility also creates challenges.
Communication
Players must know which side is Quarters and which side is Cover 2.
Asymmetrical Techniques
The two corners and two safeties may have very different responsibilities.
Middle-Field Stress
Crossing routes can move from one coverage structure into another.
Cover 2-Side Hole
The offense can attack the intermediate sideline area between the corner and safety.
Quarters-Side Matchups
The Quarters corner may be isolated against #1 when the safety is occupied by #2.
Motion
Motion can change the receiver distribution and force the defense to reset the coverage.
Trips
Three-receiver formations require specific rules.
Play Action
Aggressive Quarters-side safety support can create openings behind the safety.
Try The Interactive Playbook Tool: Cover 6
Draw your own Cover 6 concept based play diagram right here using our embedded interactive play designer demo:
GET STARTED: To get started simply click on any of the player icons in the diagram.
Start drawing your own plays like this and build your playbook with CoachYouths Playbook Designer.
Choosing the Quarters Side
The defense needs a rule for determining which side receives Quarters.
Possible methods include:
- Formation strength.
- Passing strength.
- Tight end location.
- Field side.
- Boundary side.
- Receiver count.
- Game-plan call.
For youth football, the rule should remain consistent.
For example, a defense might always play Quarters to the passing strength and Cover 2 away from it.
Another defense might use Quarters to the field and Cover 2 to the boundary.
The specific choice matters less than making sure all eleven defenders use the same rule.
Choosing the Cover 2 Side
The Cover 2 side may be selected because the defense wants:
- Safety help over an isolated receiver.
- Strong flat support from the corner.
- A physical reroute on #1.
- Protection against a particular route tendency.
- A different run-support structure.
A dangerous outside receiver can be a reason to place Cover 2 principles to that side.
The underneath corner can disrupt the release while the safety remains over the top.
Cover 6 Against 2x2 Formations
Balanced 2x2 formations provide a clean way to teach Cover 6.
One side plays Quarters.
The other plays Cover 2.
The defense can practice each side independently before combining them.
On the Quarters side:
- Corner reads #1.
- Safety reads #2.
On the Cover 2 side:
- Corner controls the short outside area.
- Safety protects the deep half.
- Underneath defenders distribute the inside routes.
This is often the best starting point for installation.
Cover 6 Against Four Verticals
Four Verticals creates different responsibilities on each side.
Quarters Side
The structure naturally handles two vertical threats:
- Corner matches #1.
- Safety matches #2.
Cover 2 Side
The safety is responsible for the deep half and may face two vertical threats entering his area.
The corner and underneath defenders must reroute and affect those releases.
The Cover 2-side seam can become particularly important.
If #2 receives a completely free vertical release, the safety can be placed in conflict between #1 and #2.
The defense needs a clear reroute or carry rule underneath.
Cover 6 Against Smash
Smash can attack the Cover 2 side with:
- #1 hitch.
- #2 corner.
The corner is threatened by the short route while the safety must defend the corner route.
This is a traditional Cover 2 stress.
The corner should sink when possible and force the quarterback to make a difficult throw between defenders.
On the Quarters side, Smash can distribute differently because the safety may match #2’s corner route while the corner drives #1 once he confirms the short route.
The same offensive concept can therefore receive two different defensive answers on the same play.
Cover 6 Against Slant/Flat
Slant/Flat attacks underneath spacing.
On the Cover 2 side:
- Corner can aggressively handle the flat.
- Inside defender closes the slant window.
On the Quarters side:
- The route distribution determines how the safety and underneath defender react.
- The corner must not abandon a vertical threat prematurely.
The offense may prefer attacking whichever side creates the more favorable leverage.
The defense should understand where its short completion is most likely to occur and rally to tackle.
Cover 6 Against Curl/Flat
Curl/Flat can stress both halves differently.
On the Cover 2 side, the corner is placed in a high-low conflict between the flat and curl.
On the Quarters side, the corner and safety may be able to react based on the releases of #1 and #2.
The underneath defenders must maintain proper spacing.
If the flat defender widens too quickly, the curl can settle inside him.
If he stays too far inside, the offense can repeatedly take the flat.
Cover 6 Against Flood
Flood is particularly useful for testing Cover 6 because it creates three receiving levels to one side.
If Flood attacks the Cover 2 side:
- Corner handles the flat relationship.
- Safety protects the deepest route.
- An underneath defender must close the intermediate window.
If Flood attacks the Quarters side:
- The corner and safety distribute the deeper threats according to Quarters rules.
- The underneath defender must handle the flat or intermediate route.
The defense should practice Flood to both sides because the answers are not identical.
Cover 6 Against Post Routes
The Quarters-side corner can become vulnerable to a post if the safety is occupied by #2.
The corner must understand that inside help may not be available.
On the Cover 2 side, the deep-half safety has better leverage to help on an outside receiver breaking toward the middle, but he may also have another vertical threat entering his half.
Route combinations matter more than isolated routes.
The defense should teach players to recognize the entire distribution.
Cover 6 Against Corner Routes
Corner routes can attack the Cover 2-side hole between the underneath corner and deep safety.
The corner should gain depth when no immediate flat threat exists.
The safety must maintain enough width to defend the route.
On the Quarters side, a corner route by #2 may be matched by the safety.
The offense can therefore use the same route to attack different defenders depending on which side it is run.
Cover 6 Against Mesh
Mesh sends crossing routes through the underneath coverage and can expose communication problems between the two coverage halves.
The defense needs rules for:
- Shallow crossers.
- Intermediate crossers.
- Routes moving from Quarters into the Cover 2 side.
- Routes moving from Cover 2 into the Quarters side.
Underneath defenders should communicate route exchanges.
Safeties must recognize when a crossing route becomes deep enough to threaten their responsibility.
Cover 6 Against Switch Releases
Switch releases can challenge both coverage structures.
On the Quarters side, the corner and safety need rules for exchanging #1 and #2.
On the Cover 2 side, the safety must recognize which receiver is becoming the true deep threat while the corner reroutes underneath.
Because the two sides use different rules, the defense should practice switch releases separately to each side.
Cover 6 Against Trips
Trips is one of the most important adjustments for Cover 6.
Three receivers to one side can change the preferred split-field structure.
The defense needs to account for:
- #1.
- #2.
- #3.
- The backside receiver.
- The running back.
Possible approaches include:
- Playing Quarters principles to the Trips side.
- Using a special Trips match.
- Bracketing the backside receiver.
- Checking to another coverage.
- Adjusting the split-field call.
There is no universal solution.
For youth football, the defense should have one clear Trips rule rather than a large menu of checks.
Cover 6 Against an Isolated Receiver
An isolated backside receiver is one reason a defense may use Cover 6.
The defense can place the Cover 2 side toward that receiver.
That gives:
- An underneath corner disrupting the receiver.
- A safety over the top.
This can create a bracket-like relationship depending on the route and technique.
It can be useful against an offense that isolates its best receiver away from the formation strength.
The defense can then play Quarters toward the multi-receiver side.
Cover 6 Against Bunch
Bunch formations make receiver identification more difficult.
The defense may need:
- A bunch check.
- Modified receiver numbering.
- Banjo principles.
- Box coverage.
- Another automatic call.
Trying to preserve normal split-field rules against tightly compressed releases can create confusion.
The defense should decide before game day whether Cover 6 remains active against bunch or automatically checks to another structure.
Cover 6 Against Motion
Motion is one of the biggest communication tests for Cover 6.
Motion can change:
- Formation strength.
- Receiver count.
- Which side has Quarters.
- Which side has Cover 2.
- The run strength.
- The isolated receiver.
The defense needs a simple rule.
Possible approaches include:
- Keep the coverage attached to the original sides.
- Reset the coverage based on the new formation.
- Follow a specific receiver.
- Check to a simpler coverage.
For youth teams, simplicity is especially important.
The defense should avoid requiring multiple players to completely reverse their techniques seconds before the snap unless those adjustments have been practiced extensively.
Cover 6 and the Run Game
Cover 6 creates different run-support relationships to each side.
Quarters Side
The safety may become an active run fitter when #2 blocks or removes himself as a vertical threat.
Cover 2 Side
The corner is already positioned underneath and may become an important force defender.
This gives the defense two different methods of creating perimeter support.
The front must understand those differences.
The run fit should identify:
- Force.
- Alley.
- Cutback.
- Inside gaps.
- Quarterback responsibility when applicable.
Coverage terminology alone does not define the complete run defense.
Quarters-Side Run Support
The Quarters safety can often become an extra run defender based on his read of #2.
If #2 blocks:
- The safety can trigger downhill.
- He enters his assigned fit.
- He maintains the required leverage.
This can make the box appear lighter before the snap than it actually plays after the run declares.
The safety must remain disciplined against play-action.
He should trigger because his key tells him run, not simply because the running back receives a fake handoff.
Cover 2-Side Run Support
The Cover 2 corner commonly has an important perimeter responsibility.
He may be the:
- Force defender.
- Edge setter.
- Outside contain player.
He should:
- Defeat receiver blocks.
- Maintain outside leverage.
- Force the runner toward pursuit.
- Tackle when the ball reaches him.
The safety supports from depth.
If the corner loses leverage, the safety may be forced into a difficult open-field tackle.
Cover 6 Against Play Action
Play-action can attack the Quarters side by manipulating the safety.
If #2 appears to block, the safety may trigger downhill.
The offense can then release a receiver behind him.
The safety should:
- Read his assigned key.
- Confirm the block.
- Maintain disciplined eyes.
- Recognize delayed releases.
- Avoid overcommitting to backfield action.
On the Cover 2 side, the deep safety must also remain disciplined.
Both halves can be attacked by play-action, but the offense may use different routes to exploit each structure.
Cover 6 Against RPOs
RPOs can target the different run-support defenders in Cover 6.
The offense may read:
- The Quarters safety.
- The Cover 2 corner.
- An underneath linebacker.
The defense should identify which player is being placed in conflict.
If the quarterback repeatedly reads the Quarters safety, the defense may adjust the front or coverage so that defender is no longer responsible for both the run fit and the throw.
The answer should come from the structure rather than asking one defender to defeat an impossible conflict.
Cover 6 and the Pass Rush
Cover 6 commonly pairs with a four-man rush.
The pass rush should:
- Maintain contain.
- Compress the pocket.
- Force the quarterback to make post-snap decisions quickly.
- Prevent extended plays.
The split-field structure can make the quarterback hold the ball because the coverage may not match his pre-snap expectation.
The rush needs to capitalize on that hesitation.
Cover 6 and Quarterback Scrambles
Underneath zone defenders can maintain vision toward the quarterback and react to scrambles once their immediate coverage threats are controlled.
The pass rush must maintain lane integrity.
The safeties should not abandon deep receivers simply because the quarterback begins moving within the pocket.
A scramble becomes a secondary concern only after the defender’s primary coverage responsibility allows him to react.
Disguising Cover 6
Cover 6 naturally shares a two-high pre-snap shell with several coverages.
The defense can show a similar alignment before playing:
- Cover 2.
- Cover 4 Quarters.
- Cover 4 Palms.
- Cover 6.
- Other split-field coverages.
That makes the quarterback identify the coverage after the snap rather than relying solely on safety depth.
The corners may provide clues because one is playing Quarters technique and the other Cover 2 technique.
Defenses can work to minimize those clues without compromising assignment execution.
Cover 6 and Field/Boundary Calls
A common way to organize Cover 6 is by field position.
The defense may call:
- Quarters to the field.
- Cover 2 to the boundary.
Or it may reverse that structure.
Quarters to the Field
This can help handle multiple receivers using the greater width of the field.
Cover 2 to the Boundary
The shorter distance can make it easier for the safety to protect the deep half while the corner plays aggressively underneath.
Another defense may choose the opposite based on personnel and tendencies.
The important coaching point is consistency.
Cover 6 and Formation Strength
The coverage can also be set according to offensive strength.
For example:
- Quarters toward two-receiver strength.
- Cover 2 away from strength.
This can create a useful structure against formations with an isolated backside receiver.
The defense should define what determines strength:
- Number of receivers.
- Tight end.
- Passing strength.
- Back location.
- Field position.
Players should not be forced to guess.
Cover 6 and Personnel Matchups
Cover 6 can be used to protect a particular matchup.
If the offense has a dominant outside receiver, the defense may use the Cover 2 side toward him.
The corner can disrupt the receiver underneath while the safety provides deep help.
On the opposite side, the defense can play Quarters and allow the corner and safety to match the remaining receivers.
This makes Cover 6 useful as a game-plan coverage rather than only a generic zone call.
Spot-Drop and Match Versions
Cover 6 can be taught with different levels of complexity.
Spot-Drop Version
Defenders protect defined zones within the Quarters and Cover 2 structures.
Advantages:
- Easier installation.
- Simpler communication.
- Appropriate for inexperienced players.
Match Version
Defenders use receiver releases to determine how routes are carried, passed, or exchanged.
Advantages:
- Tighter coverage.
- Better adaptation to route distribution.
- Stronger answers against vertical concepts.
The match version also creates more opportunities for assignment errors.
Youth coaches can begin with clear zone responsibilities and add match rules gradually.
Coaching Cover 6 in Youth Football
Cover 6 should generally be installed after players understand Quarters and Cover 2 separately.
A practical progression is:
- Install basic Cover 2.
- Install basic Quarters.
- Review receiver numbering.
- Assign one side as Quarters.
- Assign the other side as Cover 2.
- Walk through the complete structure.
- Practice 2x2 formations.
- Practice Four Verticals.
- Add Slant/Flat.
- Add Smash.
- Add Curl/Flat.
- Add Flood to both sides.
- Add switch releases.
- Install a Trips adjustment.
- Add bunch and motion rules.
- Connect both sides to the run fits.
- Add play-action and RPO periods.
Players should understand that they are not learning two new coverages.
They are combining two structures they already know.
A Simple Split-Field Drill
Align the full secondary against a 2x2 formation.
Call one side:
Quarters.
Call the other:
Cover 2.
Before the snap, require each defender to state his responsibility.
Then run simple concepts:
- Four Verticals.
- Slant/Flat.
- Smash.
- Curl/Flat.
After each repetition, ask:
- Which side was Quarters?
- Which side was Cover 2?
- Who was #1?
- Who was #2?
- Who had the deep responsibility?
- Who had the flat?
This reinforces the asymmetrical structure.
A Two-Side Route Drill
Run the same route concept to both sides of the formation.
For example, run Smash on both sides.
The Quarters side must execute its rules.
The Cover 2 side must execute its rules.
This teaches players that identical offensive routes can require different defensive responses depending on the coverage half.
That is one of the most important concepts in Cover 6.
Common Youth Football Mistakes
Both Corners Play the Same Technique
The Cover 2 corner drops deep or the Quarters corner stays underneath.
Safeties Forget Which Side They Own
Both safeties attempt to play Quarters or both play deep-half technique.
Players Treat Cover 6 as Two Unrelated Defenses
Crossing routes expose the lack of communication between the halves.
Quarters Safety Bites on Play Action
He triggers downhill without confirming his receiver key.
Cover 2 Corner Loses Outside Leverage
The offense gains the perimeter in the run game.
No Seam Answer on the Cover 2 Side
#2 releases vertically without being rerouted or carried.
Poor Trips Adjustment
The defense attempts to use the same 2x2 split against three receivers without a plan.
Motion Changes the Formation
Half the defense resets the coverage while the other half keeps the original call.
Players Forget the Run Fit
They know the pass zones but do not know who is force or alley.
Personnel Considerations
Cover 6 places different demands on defenders depending on the side.
Quarters-Side Corner
Useful traits include:
- Vertical coverage ability.
- Route recognition.
- Leverage discipline.
- Tackling.
Quarters-Side Safety
Useful traits include:
- Ability to cover #2 vertically.
- Run-support ability.
- Route recognition.
- Communication.
Cover 2-Side Corner
Useful traits include:
- Physical rerouting ability.
- Open-field tackling.
- Quick reaction to short routes.
- Perimeter run support.
Cover 2-Side Safety
Useful traits include:
- Range.
- Deep-ball awareness.
- Ability to defend multiple vertical threats.
- Discipline.
A defense does not need both safeties or corners to have identical skill sets.
Cover 6 can actually help place players into roles that fit their strengths.
When to Call Cover 6
Cover 6 can be useful when:
- The offense presents different threats to each side.
- The defense wants Quarters against a multi-receiver side.
- The defense wants safety help over an isolated receiver.
- The offense frequently uses 2x2 spread formations.
- The defense wants a two-high shell with split-field flexibility.
- The defense has different strengths among its corners or safeties.
- Field and boundary tendencies matter.
- The defense wants to disguise several split-safety coverages from similar alignments.
A simpler coverage may be preferable when players struggle to communicate formation strength, motion, or different techniques on opposite sides.
Cover 6 vs. Cover 4 Quarters
Cover 4 Quarters: Uses Quarters principles across both sides of the formation.
Cover 6: Uses Quarters principles on one side and Cover 2 principles on the other.
Cover 6 sacrifices the symmetry of full-field Quarters in exchange for the ability to solve different problems to each side.
Cover 6 vs. Cover 4 Palms
Both are two-high coverages capable of changing responsibilities based on receiver distribution.
Palms: Uses a two-read relationship between the corner and safety, often allowing the corner to drive a short outside route by #2 while the safety takes #1 over the top.
Cover 6: Commonly combines a Quarters side with a Cover 2 side.
A defensive system can use Palms principles as part of its broader split-field package, but the concepts describe different coverage structures.
Cover 6 vs. Cover 2
Cover 2: Uses two deep-half safeties across the entire field.
Cover 6: Uses a Cover 2-style half on one side and Quarters on the other.
The Cover 2 side of Cover 6 can look familiar, but the opposite side operates under different rules.
Cover 6 vs. Cover 3
Cover 3: Commonly uses a single-high safety and three deep thirds.
Cover 6: Commonly uses a two-high shell with quarter-quarter-half distribution.
Cover 3 can naturally place an extra defender near the box before the snap.
Cover 6 can gain run support through the Quarters safety and Cover 2 corner while preserving a split-safety presentation.
Key Coaching Points
- Install Cover 2 and Quarters before combining them.
- Define exactly how the defense determines the Quarters side.
- Define exactly how it determines the Cover 2 side.
- Use consistent receiver numbering.
- Make the different corner techniques obvious.
- Make the different safety responsibilities obvious.
- Practice Four Verticals to both sides.
- Practice Smash and Flood to both sides.
- Establish a seam answer on the Cover 2 side.
- Teach the Quarters safety’s run/pass key.
- Connect the Cover 2 corner to the perimeter run fit.
- Install a specific Trips adjustment.
- Establish simple motion rules.
- Practice routes crossing from one coverage half into the other.
- Use disguise only after the split-field assignments are dependable.
Final Thoughts
Cover 6 gives a defense the ability to play two complementary coverage structures on the same snap.
On one side, Quarters principles allow the corner and safety to match vertical threats while keeping the safety available for run support when his receiver key allows it. On the other side, Cover 2 principles place the corner underneath with a safety protecting the deep half.
That asymmetry is the reason to use the coverage.
The defense can protect an isolated receiver differently from a multi-receiver side, adjust to field and boundary, fit the strengths of individual defenders, and present a two-high shell without committing to the same coverage rules across the entire formation.
The challenge is making the two halves function as one defense.
For youth football, the best installation path is to teach Cover 2 and Quarters separately, make sure players understand both, and then combine them with one simple rule that determines which side receives each coverage.
When players can identify their side, execute the correct technique, communicate routes crossing the formation, and fit the run consistently, Cover 6 becomes a practical and flexible addition to a two-high defensive system.
Related Articles
Published by CoachYouths Staff on 08/25/2026
You are NOT currently logged in, you may login or signup for FREE at any time: